
NAVIGATION
I’ve been asked time and time again for a definitive step-by-step guide to building a tiny house. As someone who’s been through the tiny house building process and walked others through it many times, I’m happy to share this experience with you. I wanted to include a basic outline to show you the steps I took to build my tiny house. It can be an intimidating process at first, but this list should help eliminate some of your worry and confusion.
If you’re seeking tiny house building plans and other specifics, please visit my in-depth review on tiny house building plans before you buy. If you’re considering building, but don’t know where to start, the tiny house building checklist below will give you a full overview of what planning, construction and set up entails. It’s always nice to have an overview before you jump into a project, especially one this in-depth and important.
Building a tiny house is completely doable! You simply need to plan, be open to understanding the process thoroughly, and prepare to learn from others’ mistakes. Chances are you’ll run into a few roadblocks along the way, especially if you’re new to home construction, but it’s a satisfying learning process with great end results!
For a more comprehensive guide, check out: How to Build a Tiny House.
TINY HOUSE BUILDING CHECKLIST
This tiny house building checklist is broken down into steps by project and stage. While some stages and phases of construction may overlap, I’ve tried to give them in the optimal order. Where appropriate, I’ve included links to posts that expand on each step.
Phase 1: Before You Build Your Tiny House
The planning and brainstorming phase is vitally important to the building process. Of course, logistics, plumbing, solar and other tiny house construction steps are key too, but in the end, it all comes down to taking the time to plan. Set yourself up for success by creating a strong, research-based construction plan, before you even pick up a hammer.
Planning Your Tiny House
- Determine your true needs and ability to live in a tiny house: What Do You Need to Live in a Tiny House
- Research a possible building sites and land: How To Set Up Land For a Tiny House
- Talk with other tiny house people—builders and owners: How I Interviewed Tiny House Builders
- Create a rough tiny house floor plan: 10 Tiny House Design Tips
- Determine the major features you’ll need in your tiny house
- Draft or purchase building plans: Tiny House Plans Review
- Create and determine your budget
- Address the top 5 barriers to building a tiny house: Barriers, Solutions Part I, Solutions Part II
- Start training, learning the basics, and building your construction skills with this Getting Started Guide
Sourcing Tiny House Components
You’ll need to source the following items. Many you may already have these items on hand or be able to trade and barter with friends and family.
- Trailer – My Trailer
- Windows: Ordering Windows
- Lumber
- Tools – Basic Tools I Used
- Appliances – My Tiny House Kitchen
- Knowledgeable friends
- Professionals: Raising the Roof: My Roof Install
Access & Logistics
 This is the time to think through how to build a tiny house from start to finish. Think through the process starting with how to get your trailer on to the build site and how you’ll get it out if you ever need to move it. In your mind, play out each step of the build process and see where problems come up or challenges may arise.
- Consider your larger items. When will you bring in your mattress, appliances, shower stall, toilet, furniture, and so on, if they won’t fit through your front door?
- Try to time ordering your building materials so they arrive right when you need them and make sure you have the proper supplies and tools to do the job.
Phase 2: How to Build a Tiny House – Construction
Once the planning and logistics phase is complete, you’ll be ready to start construction. If you’ve gone through each of the planning steps carefully you should feel comfortable that you’ve procured 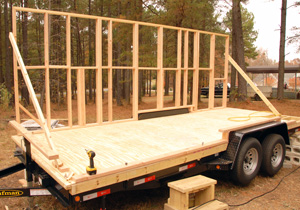 everything you need for constructing your tiny house (though no matter what you do, you’ll be making trips to the hardware store for this or that). Work out your gaps in the planning phase before you move forward with building your tiny home.
When I built my tiny house, I used the weeknights to plan and research what I was going to do each weekend when I was building. Thursday night I wrote down a shopping list take with me to the hardware store. Friday night I’d buy the materials and stage them for building the next day. This way when the weekend came, I could get right to work without feeling rushed to figure out plans or making a lot of trips to the store.
Tiny House Trailer
- Site selection: Setting Up Land for a Tiny House
- Leveling: Setting Up a Tiny House on Jack Stands
- Remove decking – I decided to get a higher weight rated trailer, so I left these on
- Cut off extras: The Trailer for My Tiny House
- Weld on anchors: Anchoring a Tiny House to the Trailer
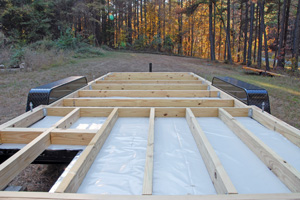
Tiny House Foundation
- Build foundation frame: Framing The Floor
- Anchor foundation to the trailer: Anchoring the Tiny House
- Attach metal flashing: Adding the Deck Flashing
- Add insulation: Tiny House Building Update
- Add vapor barrier: Protecting Against Water
- Install subfloor: Framing the Floor
Tiny House Wall Framing
- Frame walls: Framing My Tiny House
- Ensure squareness by using a good level. Here’s the level I use
- Test fit windows
- Sheathe your tiny house walls: Tiny House Sheathing
- Consider big items that might not fit through the door (e.g. shower stall, mattress, fridge)
- Raise walls, square and brace: Framing My Tiny House
- Secure framing to the trailer via anchors: Anchoring a Tiny House to the Trailer
Tiny House Sheathing
- Measure & plan layout: here’s my favorite tape measure
- Cut all pieces
- Allow for 1/8″ expansion gap between sheets of plywood
- Test fit the sheets
- Apply glue to all studs: Tiny House Sheathing
- Tack the sheets in place with a few nails (note: use screws and nails for treated wood)
- Screw every 3″ on edges of panels: My favorite impact driver here
- Screw every 6″ into studs covered
- Anchor the plywood to the foundation after the walls are raised
Windows and Door Rough Openings
- Double check the window dimensions (note: give a little extra allowance)
- Cut out the window holes, using a Sawzall or plunge router
- Apply house wrap (WRB), Tyvek or Typar
- Cut the house wrap, using inverted “Y” – My favorite box cutter
- Test fit windows
- Flash window sills at a 5-degree angle
- Install the windows and shim
- Tack with a few screws
- Test window functionality
- Secure the windows per manufacture recommendations
- Flash windows, starting at the bottom and working up
- Leave the bottom edge unsealed for water drainage
Tiny House Roof Framing
Note: If building the Fencl tiny house design, first install loft collar ties and flooring
- Construct trusses per plans
- Make sure you tie into your wall framing with Hurricane Ties
- Ensure height stays under 13.5 feet
- Build headers for rough opening for skylight
Roof Sheathing
- Plan layout and dimensions
- Cut boards
- Glue truss edges
- Use “H” clips between sheets: Get them here
- Secure with ring shank nails and screws
Install Skylights
- Build frame if using curb mounted (there’s no need to frame with deck mounted)
- Test fit skylight
- Install skylight per directions
- Flash according to directions
Door(s)
- Frame in the doorframe
- Build the door or purchase
- Test fit the door to the frame
- Shim and secure the door to the frame
- Consider a temporary plywood door during construction
- Install the door hardware
Siding
- Tape the house wrap seams
- Install the furring strips
- Paint BOTH sides of siding before putting up
- Hang the siding
Outside Trim Work
- Install fascia boards
- Install drip edge
Roofing
- Apply ice & water shield
- Install reflection barrier (need .5″ gap)
- Install furring strips
- Install roof per manufacture’s recommendations
Rough Plumbing
Note: This may be an area to consider hiring a professional.
- Plan drains, inlets, holes in floor, etc.
- Check for trailer cross beams under trailer
- Account for vents if needed
- Account for “P” traps
- Account for proper slope so water drains well
Rough Electrical
Note: Hiring a professional is highly recommended.
- Plan out locations of outlets, lights, fans, sockets, etc.
- Plan locations for smoke and carbon monoxide alarms
- Consider your power usage
Rough Gas Lines
Note: Hiring a professional is highly recommended.
- Plan out locations needed
Rough HVAC
Note: Hiring a professional is highly recommended.
- Plan out locations needed
Insulate
Note: ensure your materials and fasteners that come in contact with foam don’t react
- Install insulation
- Foam in edges
- Install vapor barrier to 6-millimeter thickness
- Ensure your materials and fasteners that come in contact with foam are okay (some react)
Install Major Appliances
- Water heater
- Fridge (you may wish to wait till later)
- Shower
- Heater
Flooring
- Follow directions
- Cover with durable protection layer
Walls
- Hang wall panels
- Trim around lights and edges
Kitchen
- Plan out locations needed for layout and storage
- Construct a rough frame for cabinets and countertops
- Install counter top
- Drop in the stove and connect
- Drop in the sink and connect
- Build and install cabinet doors
- Build in shelving
Bathroom
- Plan out locations needed for layout
- Finish the shower stall connections
- Finish bathroom walls
- Finish bathroom storage
- Connect toilet (or build composting unit)
- Install vent (consider having on timer for whole house air exchange)
Sleeping Loft
- Install any additional storage
- Wire in lights and outlets
- Take a nap, you deserve it!
Main Room
- Finish HVAC
- Wire lights and outlets
- Build any built-in units
- Finish storage
Phase 3: Celebrate!
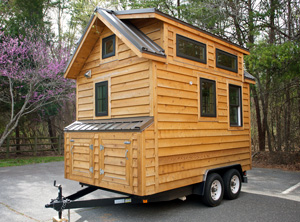 Once your tiny house buildout is finished (and it’s a BIG job to build a tiny house), it’s time to move and settle in. Fortunately, once you’ve mastered the logistics of how to build a tiny house and finished the building process, moving into your tiny home should be a piece of cake.
- Clean up debris and surfaces
- Move into your new tiny home
- Invite awesome friends who helped
- Sit back and enjoy!
In Conclusion: Plan Before You Build
As you can see, building a tiny house is an involved, but manageable process. There are many great resources available, including the ones here on The Tiny Life. As you explore how to build a tiny house, really take time up front to do phase 1, thoroughly. Planning is the most vital step. Of course, you can’t plan for every contingency that comes along, but if you’ve prepared as much as possible, the building process will be much smoother.
Your Turn!:
- What step of the tiny house building seems the most challenging for you?
- What skills do you need to build before you start building your tiny house?
Related Posts


learn how to build tiny house in just 2 steps
If you are planning to build a tiny house, or even just fit a large shed out as a bit of a guest suite then this excellent tutorial I found HERE ( tiny-house.best-tips.info ) will show you that’s possible! So fascinating to see how much you can fit into a really compact space.
If you are planning to build a tiny house, or even just fit a large shed out as a bit of a guest suite then this excellent tutorial I found HERE ( tiny-house.best-tips.info ) will show you that’s possible! So fascinating to see how much you can fit into a really compact space.
If anyone is preparing for building a tiny house then they should visit this blog to get more knowledge.
What vehicle do you tow your tiny house with and what is the final weight of the house?
My name is Anthony,I’m just getting ready to go start the process,my frame used to be a camper I purchased it from the pawnshop 28’1” will it work for a tiny home 2 x 6 construction metal box frame
I found your article on building a tiny house and it sounds fascinating! I’m really excited to read more.
Subcribe to Boogie..Please
Hello? I want to have a tiny house in one location (RV park), then want to move it to another property in another state after a couple years. Where the house would be moved to is in a my lower back yard. The house can be towed there, but can it be taken apart and reconstructed in the new location? Thanks!
Thank you for posting this list!!
I already have a good idea to what I want in my tiny house because I have a lot of little people that I’m trying to come with me I need a tiny house for two children and three adults I need two bathrooms I need a washer and dry and laundry room I need a full kitchen big living room dining room and a den I cannot walk up to no steps I need a straight floor straight through my bathroom I want a full bathroom shower tub sink and vanity I’m my second bathroom just want to showers, sink the toilet that flush. And I only going to spend for the whole house is $95,500.
If you are planning to build a tiny house, or even just fit a large shed out as a bit of a guest suite then this excellent tutorial I found HERE ( tiny-house.best-tips.info ) will show you that’s possible! So fascinating to see how much you can fit into a really compact space.
Mine will be a 40ft pulled behind a dual axle truck. I’d like to get an electric hybrid.
Can you build a tiny house or do you know a builder in WV.
Summit 3.2 ft kitchenette sells for $2600 includes sink mini fridge, freezer in a cabinet pluse a small 4 burner stove with 2 shelf oven. I found it on Wayfair.com
I wish I can find a similar style article for converting a tuff shed, like the Richmond 16×28 for instance, into a tiny house.
Thanks for sharing the information!! Local law 11 contractor ny plays a crucial role in maintaining the safety and structural integrity of our buildings. It’s essential to hire a contractor who is well-versed in the local regulations and can ensure that your property complies with the requirements. Safety should always be a top priority!
I would like to speak to someone about a tiny house project.
Do they require sprinklers?
Dear Sir.
We are interested in your Tiny Houhse and would like you to contact us at josephwilburs at yahoo. ca for our discussion.
Thanks.
Wilburs
I am a retired United States Army veteran, I am also 65 years old, I can’t afford to live where I live because my retirement doesn’t give me that much money. I need to find an affordable place to live because I can no longer work. Can someone help me?
I found your tiny house building checklist incredibly thorough and well-organized! It’s clear that you’ve put a lot of thought into each stage of the process, which is so helpful for anyone embarking on this journey. I particularly appreciated the sections on budgeting and legal considerations; these aspects are often overlooked but crucial for a successful build.
One aspect I’m curious about is how you prioritize the different elements of the checklist. For example, how do you decide which tasks should be completed first to avoid potential setbacks or overlaps in the construction process? Additionally, are there any common pitfalls you’ve observed that might not be immediately apparent from the checklist?
Do you build these? If so would like to purchase 3303076367
Great checklist! It’s so detailed and covers all the essential steps for building a tiny house. I appreciate the tips on maximizing space and sustainability. Can’t wait to get started on my own tiny home journey!
This checklist is an absolute lifesaver! I love how detailed it is—definitely helps to break down the overwhelming process of building a tiny house. Excited to start my journey with these steps! Thanks for sharing such valuable information!
How to title on a tiny home on a stationery trailer located in NC in MN. It’s considered an RV in NC and DMV. The MN DMV says it needs to be registered as a Commercial Trailer and can’t be titled. I don’t think that’s right so want expert advice please. Thank you.